The Ultimate Guide to Beads Embroidery: Tips & Supplies
Beads embroidery involves stitching beads onto fabric to create detailed and colorful designs. It’s a versatile craft for creating unique jewelry, home decor, and fashion items. In this guide, you’ll learn about essential supplies, practical techniques, and creative project ideas to get started with bead embroidery.
Key Takeaways
-
Gather essential supplies like various beads, specialized needles, and durable threads before starting your bead embroidery journey.
-
Master basic techniques and stitches like backstitch and couching to secure your beads properly and enhance your designs.
-
Explore advanced techniques such as creating dimension with beads and incorporating crystals to elevate your bead embroidery projects.
Essential Bead Embroidery Supplies
Starting your bead embroidery journey requires the right supplies. Success in embroidery projects depends on choosing appropriate materials and tools. You’ll need:
-
Various beads
-
Specialized needles
-
Durable threads
-
Suitable fabrics Beginners should gather these essential supplies and practice basic techniques to build a solid foundation.
Selecting the right beads, needles, and fabrics can significantly impact your embroidery piece. First, let’s dive into the world of beads, which will bring your designs to life.
Choosing the Right Beads
Choosing the right beads is crucial in bead embroidery. The type of beads determines the texture, color, and overall aesthetic of your project. For example:
-
Miyuki seed beads are known for their uniformity and variety of colors.
-
They are ideal for intricate designs.
-
Their consistent size and color help create smooth, even rows.
-
This consistency enhances the precision of your beadwork.
Toho beads are another excellent choice, known for their high quality and nice vibrant colors in Japan. These beads are similar to perfect options for adding detailed patterns to your embroidery pieces.
For larger beads, consider incorporating them to add dimension and texture, creating a more dynamic and visually appealing design. Whether you are crafting earrings, bracelets, or other jewelry pieces, the right beads can make all the difference in your bead embroidery projects.
Needles and Threads
Using the right needle and thread is key to successful bead embroidery. Consider the following when choosing a needle:
-
Use a beading needle, which is slender, long, and sharp.
-
It works well with delicate fabrics and small beads.
-
Ensure the needle fits through the bead holes to avoid damage.
-
The correct needle helps securely sew beads onto the fabric without causing tears or distortions.
Six-stranded DMC embroidery thread is recommended for its thickness and durability. Maintain bead stability by pulling the thread snug so beads lie flat against the fabric, ensuring each bead is properly secured to avoid slippage. One strand of this thread can also be used for finer details.
Using a thread conditioner can help reduce friction and tangling while stitching. These considerations will help you achieve neat and professional-looking embroidery projects.
Fabrics for Bead Embroidery
Selecting the right fabric is just as important as choosing the right beads and threads. Consider the following when choosing fabric:
-
Velvet is popular for its rich texture and ability to hold beads securely.
-
Ensure the fabric isn’t too thick for the beading needle.
-
A tight weave fabric prevents beads from slipping or falling out during embroidery.
Proper fabric preparation is also crucial. Wash and iron the fabric to ensure it is clean and smooth for stitching. Stabilize the fabric using interfacing to prevent distortion during stitching.
With the right white fabric and preparation, you can easily create a fun and beautifully designed quantity of durable embroidery pieces that will stand the light test of love hope time.
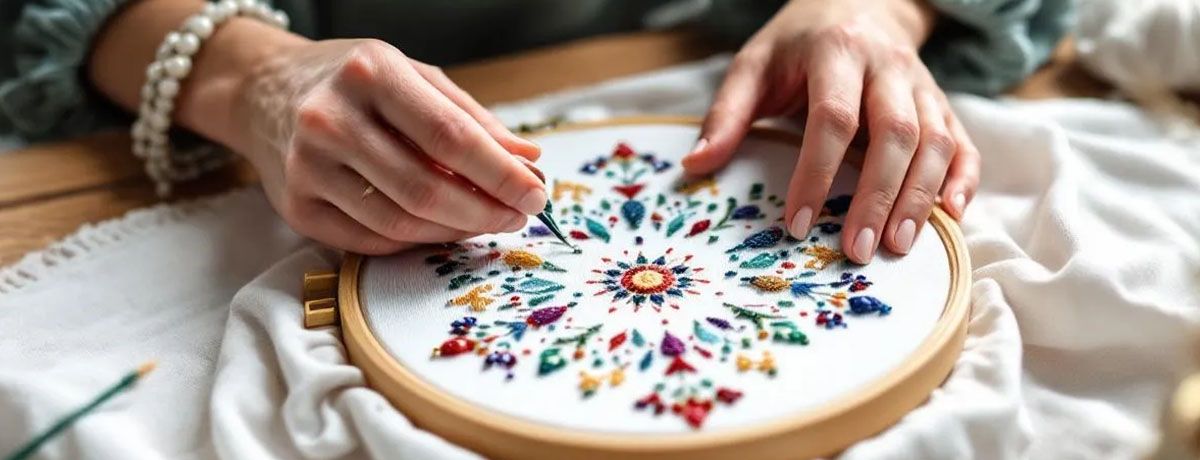
Getting Started with Bead Embroidery
With your essential supplies gathered, it’s time to start bead embroidery. This craft combines traditional stitching techniques with decorative beads to enhance fabric projects, adding a unique personal touch. Whether creating wearable items or decorative pieces, bead embroidery offers a wide range of styles and creativity.
We’ll guide you through the initial steps of bead embroidery, from preparing your fabric to mastering basic stitches and techniques. Understanding these fundamentals will equip you to add beads to your projects and bring your creative visions to life.
Preparing Your Fabric
Preparing your fabric is the first crucial step in bead embroidery. Consider the following:
-
The texture and weight of the fabric affect bead adherence and the finished piece’s appearance.
-
A tight weave fabric prevents beads from slipping or falling out during embroidery.
-
Securing your fabric in an embroidery hoop prevents shifting during stitching.
Ensure your fabric is ready for beading by washing and ironing it to remove dirt or wrinkles. Stabilize the fabric using interfacing to prevent distortion during stitching. These preparations will provide a stable base for your bead embroidery projects.
Basic Stitches and Techniques
Mastering basic stitches is key to successful bead embroidery. The backstitch is a foundational technique for attaching beads and creating outlines on the fabric, providing a strong foundation for your beadwork and ensuring beads are securely attached.
Couching is another useful technique, securing threads or beads onto the fabric surface and enhancing design stability. A tambour needle can simplify the bead embroidery process, as its design allows for easier bead attachment to the fabric.
Practicing these basic stitches and techniques will build a solid foundation for more complex projects.
Adding Beads to Your Embroidery
Adding beads to your embroidery is where the magic happens. Use a stronger thread or apply clear fabric glue to secure loose beads, ensuring your beads remain secure and your design stays intact.
When attaching beads, pull the thread snug so the beads lie flat against the fabric, ensuring each bead is secured properly to avoid slippage. Following these tips will help you create beautiful and durable bead embroidery pieces that stand out in any project.
Advanced Bead Embroidery Techniques
Once you’ve mastered the basics, explore advanced bead embroidery techniques. These focus on precise bead placement and various stitching methods to achieve intricate designs. Advanced techniques allow for greater creative expression and can significantly enhance your projects’ visual appeal.
We’ll cover creating dimension with beads, beaded bezels and cabochons, and incorporating crystals and fancy stones. These advanced techniques will elevate your bead embroidery projects to the next level.
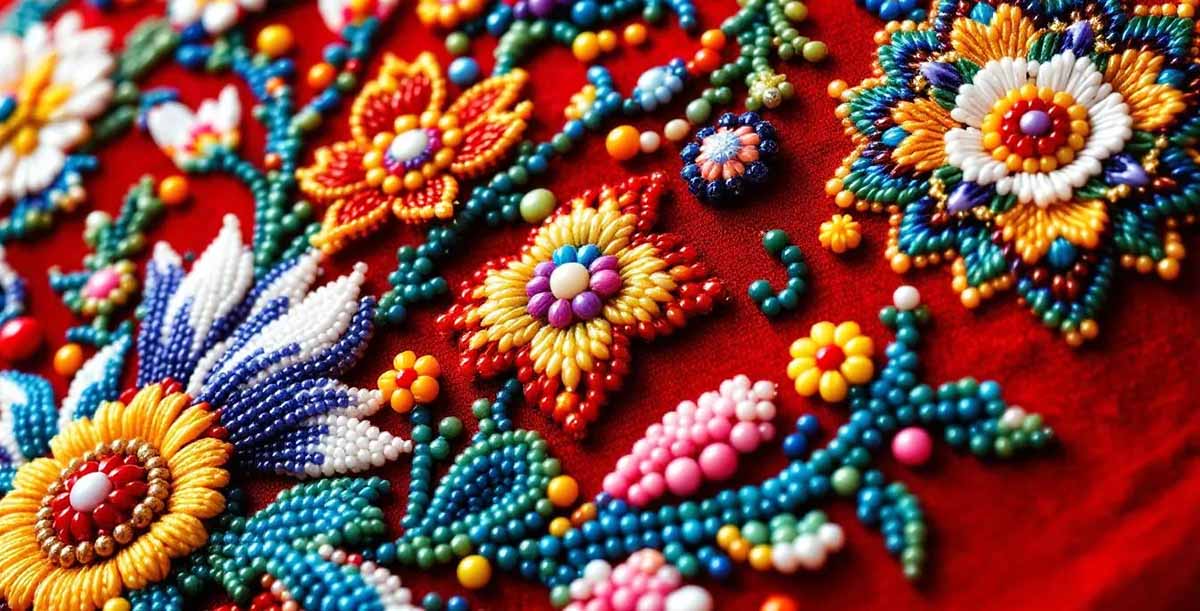
Creating Dimension with Beads
Different bead shapes and sizes can create layers and depth in bead embroidery, enhancing your piece’s visual appeal. For example, larger beads can create focal points, while smaller beads fill in details and add subtle texture.
Experiment with bead sizes and shapes can create more results in visual depth and dynamic designs. Incorporating these techniques will result in intricate and visually striking bead embroidery pieces that stand out.
Beaded Bezels and Cabochons
Beaded bezels are an excellent way to frame cabochons and other focal pieces, adding depth and enhancing your embroidery projects’ overall design. The couching technique, commonly used in bead embroidery, involves laying beads on the fabric and securing them with small stitches.
To create a beaded bezel, sew a thread or cord onto the fabric, securing it with small stitches to hold the beads in place around the cabochon. This technique ensures your focal pieces are securely attached and beautifully framed.
Incorporating Crystals and Fancy Stones
Incorporating crystals into bead embroidery can significantly increase the overall sparkle, making your designs more eye-catching and luxurious. High-quality crystals and fancy stones add an elegant touch, elevating your bead embroidery pieces’ visual appeal.
Adding crystal enhances sparkle and adds dimension, making your designs stand out. Incorporating these elements creates stunning embroidery projects that captivate attention and exude elegance.
Project Ideas for Bead Embroidery
Bead embroidery offers a range of creative project ideas tailored to your personal style and preferences. Whether creating jewelry, home decor, or fashion accessories, bead embroidery provides endless possibilities for artistic expression.
We’ll explore various project ideas, including jewelry, home decor, and fashion accessories. These idea will inspire you to start your own bead embroidery projects and create unique, personalized items.
Jewelry Projects
Jewelry projects are popular in bead embroidery. Earrings can be customized with intricate designs using bead embroidery techniques, transforming even the most basic outfit into something special.
Bracelets can be adorned with bead embroidery to incorporate various colors and textures, adding depth to their appearance. Mixing techniques like weaving and stitching creates beautiful and unique jewelry pieces that reflect your personal style.
Home Decor and Ornaments
Bead embroidery can create stunning home decor items. Decorative wall hangings add vibrancy and texture to any living space. Using bead embroidery on throw pillows elevates their design and adds a tactile element to your home decor.
Embellishing cushions with bead embroidery creates unique, personalized home accents, allowing you to add a personal touch and showcase your creativity.
Fashion Accessories
Fashion accessories are another excellent application for bead embroidery. Bags can be enhanced with personalized patterns that reflect the owner’s style. Applying bead embroidery to handbags elevates their design, making them stand out as fashionable statement pieces.
Footwear can also be embellished with bead embroidery, transforming ordinary shoes into statement pieces. Using bead embroidery techniques, you can create personalized styles that stand out and showcase your creativity.
Troubleshooting Common Issues

Despite the best preparations, common issues can arise in bead embroidery. Loose beads, tangled threads, and stitching mistakes are common challenges. Addressing these issues promptly ensures your projects remain beautiful and intact.
We’ll provide solutions for fixing loose beads, dealing with tangled threads, and correcting mistakes. These tips will help you troubleshoot common problems and maintain the quality of your bead embroidery projects.
Fixing Loose Beads
Secure loose beads using stronger adhesive or stitching them back with tight tension. This maintains the integrity of your bead embroidery and prevents beads from falling off. A strong adhesive offers a durable hold for loose beads.
Stitching loose beads back onto the fabric with tight tension ensures they stay secure. These methods ensure your beads remain firmly in place and your sewn embroidery piece stays intact.
Dealing with Tangled Threads
Managing tangled threads is a common challenge in bead embroidery. To help prevent tangles and keep your embroidery smooth and neat:
-
Use thread organizers or regularly manage the length of your working thread.
-
Maintain thread tension and check for knots to minimize tangling while embroidering.
-
Keep your workspace organized.
-
Take time to untangle knots to save frustration.
When tangles occur, gently work through the knot with your fingers or a needle. Patience is key—rushing can lead to further tangling or breakage. Integrating these practices ensures a smoother and more enjoyable embroidery experience.
Correcting Mistakes
Mistakes happen, even to the best of us. Correcting them carefully is essential to maintain the integrity of your embroidery piece. Using a seam ripper can help remove stitches without damaging the underlying fabric. If a mistake occurs in bead placement, carefully remove the affected beads and re-stitch them in the correct position with scissors.
Always work delicately when correcting mistakes to avoid causing further issues. By taking your time and using the right tools, you can cut errors and ensure your final product looks polished and professional in photos, one way. Thanks to careful thought and attention, you can achieve great results in your blog. If you have any questions, feel free to contact us.
Summary
In this ultimate guide to bead embroidery, we’ve covered everything from essential supplies to advanced techniques. Starting with the basics of choosing the right beads, needles, and fabrics, we moved on to foundational stitches and methods for adding beads to your embroidery. We then explored advanced techniques for creating dimension, beaded bezels, and incorporating crystals and fancy stones.
Bead embroidery is a versatile and rewarding craft that allows for limitless creativity. Whether you’re a beginner or an experienced crafter, this guide provides the knowledge and inspiration needed to create stunning bead-embroidered pieces. So pick up your needle, gather your beads, and let your imagination run wild!
Frequently Asked Questions
What are the best beads to use for bead embroidery?
Miyuki seed beads and Toho beads are the best choices for bead embroidery due to their uniformity and vibrant colors, perfect for adding detail to your designs. Give them a try!
What type of thread should I use for bead embroidery?
For bead embroidery, using a six-stranded DMC embroidery thread is a great choice due to its ideal thickness and durability. It’ll give your work the sturdiness it needs!
How do I prevent my fabric from distorting during bead embroidery?
To keep your fabric from distorting during bead embroidery, stabilize it with interfacing and use an embroidery hoop to hold everything securely in place. This way, you can focus on your beautiful design without worrying about shifting fabric!
What techniques can I use to add dimension to my bead embroidery projects?
Try using a variety of bead shapes and sizes in your embroidery to create layers and depth. This simple technique will really elevate the visual appeal of your projects!
How can I fix loose beads in my embroidery?
To fix loose beads in your embroidery, try using a stronger adhesive or carefully stitch them back in with tighter tension. This will help keep them secure and looking great!
Contact MH
MH offer various beads, feel free to reach out to us for more details or inquiries. We're here to help!