Hemming Mesh Fabric: A Complete Professional Guide
Mesh fabric presents unique challenges for seamstresses and tailors due to its open weave structure and delicate nature. Unlike traditional woven materials, mesh requires specialized techniques to achieve clean, professional hems without causing runs, puckering, or distortion. This comprehensive guide provides detailed instructions for successfully hemming mesh fabric, covering essential tools, step-by-step techniques, and expert tips for optimal results.
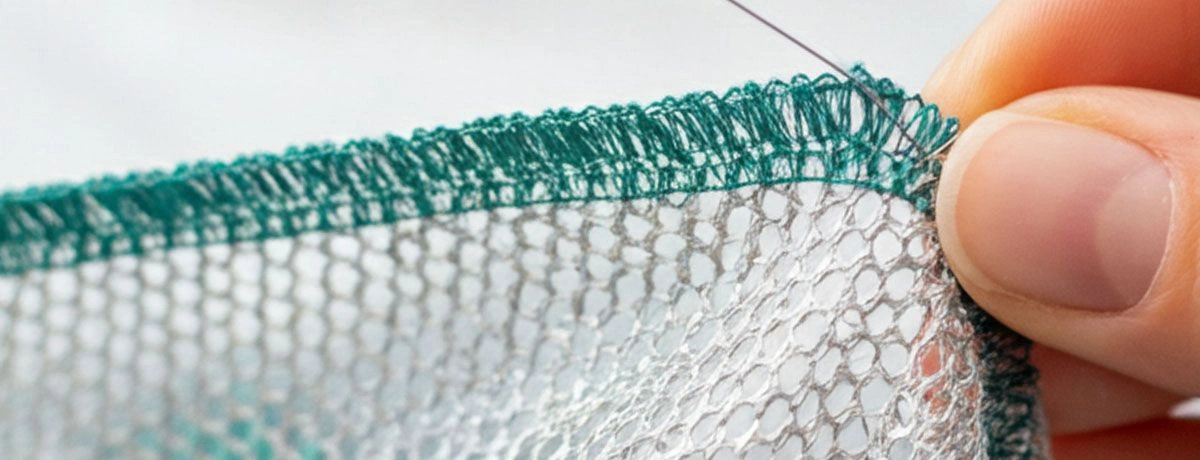
Understanding Mesh Fabric Properties
Mesh fabrics consist of interlocked loops or knots that create an open, net-like structure. The most common types include nylon mesh, polyester mesh, and cotton mesh, each with distinct characteristics that affect hemming techniques. Mesh, like other lightweight fabrics such as chiffon and organza, is often chosen for its transparency, light, and airy drape, making it suitable for garments such as dresses and blouses. These fabrics are especially popular in the construction of dresses, including special occasion garments like wedding dresses and flower girl dresses, because their delicate and sheer qualities lend a professional, elegant finish. Compared to mesh, chiffon and organza are also frequently used for creating overlays and detailed work in dresses, particularly in wedding dress design, where precise hemming and seam techniques are essential for a refined appearance.
Nylon mesh offers excellent stretch and recovery properties but can be challenging to work with due to its slippery texture. Polyester mesh provides stability and durability while maintaining moderate stretch. Cotton mesh delivers a softer hand feel but requires careful handling to prevent fraying. The weight and drape of mesh fabric can vary a bit depending on fiber content and weave, similar to other lightweight fabric options.
The open weave structure of these sheer fabrics makes them prone to snagging and running. Understanding your specific mesh type helps determine the appropriate hemming approach and prevents common issues during the sewing process.
Essential Tools and Materials
Professional hemming mesh fabric requires specific tools designed to handle delicate materials. A high-quality sewing machine with adjustable stitch settings forms the foundation of your toolkit. Ballpoint or stretch needles (size 70/10 or 80/12) prevent snagging and runs in the mesh structure.
Select polyester thread for synthetic mesh fabrics, as it provides flexibility and strength. Cotton thread works well with natural fiber mesh but may lack the stretch properties needed for some applications.
Sharp fabric scissors ensure clean cuts without pulling or distorting the mesh. Fine pins or clips secure fabric layers without creating large holes. Pattern weights are also useful to keep mesh fabric stable and prevent shifting during cutting. A seam gauge or measuring tool maintains consistent hem depths throughout the project.
Additional materials include lightweight interfacing or stabilizer for added support. Tissue paper can be used as a support layer when sewing delicate mesh to prevent stretching or puckering. Bias tape offers alternative finishing methods. When using a serger for mesh fabric, consult the serger manual for proper thread tension and machine settings. For presser feet, a special rolled hem foot is beneficial for creating narrow hems on mesh and other lightweight fabrics. Pressing tools should include a cool iron, and always use appropriate heat settings for mesh and other delicate fabrics to avoid damage.
Step-by-Step Hemming Guide
Begin by determining the desired hem depth, typically ranging from 1/4 inch for narrow hems to 2 inches for wider finishes. Choose the appropriate width for the hem based on the fabric and the finish you want to achieve. Mark the hem line using washable fabric markers or pins, ensuring measurements remain consistent across the entire edge. Before hemming, check that the right side of the fabric is facing out to ensure a neat appearance. Cutting lightweight fabrics requires laying them out straight and square to prevent shifting, which is especially important for maintaining accuracy in hem placement.
When cutting mesh, work with one layer at a time to prevent shifting. If you need to cut two layers together, secure them carefully to avoid misalignment. Trim excess fabric, leaving approximately twice the desired finished hem depth plus 1/4 inch for turning. For example, a 1-inch finished hem requires 2.25 inches of fabric from the marked line. Using a rotary cutter and self-healing mat is recommended for achieving precise cuts and minimizing fabric movement during the cutting process.
Fold the hem toward the wrong side of the fabric to keep the finished edge neat. Press the hem fold lightly using appropriate heat settings for your mesh type. Ensure the folded edge is even and well-pressed for a tidy finish. Synthetic meshes require low heat to prevent melting, while cotton mesh tolerates moderate temperatures. Use a pressing cloth to protect the fabric surface. Pressing the hem after each step contributes to a clean and professional finish, ensuring the folds remain crisp and even. Careful trimming on one side of the hem helps achieve a narrow, even finish.
Set your sewing machine for a narrow zigzag stitch or overlock stitch. These stitches accommodate the stretch properties of mesh while preventing runs. Adjust the stitch length for best results on mesh fabric, and set thread tension to medium-low settings to avoid puckering. For added security, consider using a stabilizer or tissue paper as a security measure to keep the fabric stable during stitching.
When joining two pieces of mesh, sew with right sides together to ensure a clean seam. Position the folded hem under the presser foot, aligning the needle with the fold line. Begin stitching slowly and steadily, maintaining consistent seam allowances. Guide the fabric gently and do not pull it through the machine, as excessive pull can cause the fabric to become pulled, resulting in distortion or puckering. Remove pins as you approach them to prevent needle damage.
Once the hem is sewn, it is ready for finishing. For a clean, professional look on mesh fabric, consider using a rolled hem or narrow rolled hem technique. The roll or rolled hem method involves folding the edge of the fabric tightly and stitching it in place, creating a crisp, narrow edge that works well for delicate or stretchy materials.
Professional Tips and Techniques
Achieving professional results with mesh fabric hemming requires careful construction, attention to detail, and specialized techniques. Use a walking foot or even-feed foot to prevent fabric layers from shifting during sewing. This attachment ensures smooth fabric feeding and consistent stitch formation.
Consider using water-soluble stabilizer beneath the mesh during sewing. This temporary support prevents puckering and maintains fabric stability throughout the hemming process. Remove the stabilizer according to manufacturer instructions after completing the hem.
For particularly challenging mesh fabrics, baste the hem in place using long, loose stitches before final sewing. This temporary securing allows for adjustments and ensures accurate placement of the permanent hem. Basting stitches can also help create clean folds in sheer fabric hems, making it easier to achieve a polished and professional result.
Narrow hem techniques work exceptionally well with sheer fabric and mesh materials. Create a 1/4-inch fold, then fold again to encase raw edges completely. This double-fold method provides a clean, neat finish and helps maintain the shape of the hem while adding minimal bulk to lightweight fabrics. For best results, use fine threads that match the mesh to ensure a delicate and professional appearance.
Common Mistakes to Avoid
Several common errors can compromise the quality of mesh fabric hems. Using incorrect needle types ranks among the most frequent mistakes. Regular sharp needles can snag mesh fibers, creating runs and holes that weaken the fabric structure. Using a ballpoint needle or universal needle is recommended for sewing mesh fabric with a machine, as these options minimize the risk of damage to the delicate fibers.
Excessive thread tension causes puckering and distortion in mesh fabrics. Start with lower tension settings and test on fabric scraps before hemming your main project. Gradually adjust tension as needed to achieve smooth, flat seams.
Cutting mesh fabric with dull scissors creates ragged edges that fray and run easily. Maintain sharp cutting tools and replace blades regularly to ensure clean cuts, and make sure the edges are neatly trimmed to prevent fraying and achieve a clean hem that supports professional hemming results.
Rushing the hemming process often leads to uneven edges and poor stitch quality. Mesh fabric requires patience and careful handling to achieve optimal results. Take time to properly prepare, measure, and sew each hem for consistent professional appearance.
Alternative Hemming Methods
Bias tape finishing provides an excellent alternative for hemming mesh fabric, particularly for curved edges or heavyweight mesh materials. Select bias tape that complements your fabric weight and color. Lightweight cotton or polyester bias tape works well with most mesh applications.
Fold bias tape over the raw edge of the mesh, encasing it completely. Pin or clip in place, then stitch close to the inner edge of the bias tape. This method creates a stable, finished edge while adding minimal bulk to the garment. Bias tape can also be used to create invisible hems or repairs, making the finish seamless and unnoticeable.
Serging offers another professional finishing option for mesh fabrics. A serger or overlock machine trims and finishes the edge in one operation, creating a clean, professional appearance. Adjust serger settings for lightweight fabrics and test on scraps before hemming your project.
French seams work well for mesh fabrics requiring enclosed raw edges. This technique creates a clean finish on both sides of the fabric while preventing fraying and runs along hem edges. French seams can also be used for invisible repairs, blending stitches with the fabric for a discreet, seamless look.
Caring for Hemmed Mesh Fabric
Proper care maintains the integrity of hemmed mesh fabric and extends garment life. Hand washing in cool water with mild detergent provides the gentlest cleaning method for delicate mesh materials. Avoid wringing or twisting wet mesh fabric, as this can distort the hem structure.
Machine washing requires careful attention to water temperature and agitation settings. Use cool water and gentle or delicate cycles to prevent damage to hemmed edges. Place mesh garments in mesh laundry bags for additional protection during machine washing.
Air drying preserves mesh fabric integrity better than machine drying. Lay garments flat on clean towels or hang carefully to prevent stretching. Avoid direct sunlight, which can weaken synthetic mesh fibers over time.
Store hemmed mesh garments on padded hangers or folded carefully to prevent creasing and distortion of hem areas. Avoid overcrowding in closets, which can cause snagging and damage to delicate mesh structures.
Mastering Mesh Fabric Hemming
Successfully hemming mesh fabric requires understanding fabric properties, using appropriate tools, and applying specialized techniques. The open weave structure and delicate nature of mesh materials demand careful handling and attention to detail throughout the hemming process.
Professional results come from proper preparation, correct tool selection, and patient execution of hemming techniques. Whether using traditional folded hems, bias tape finishing, or serged edges, the key lies in adapting methods to accommodate the unique characteristics of mesh fabrics.
Practice these techniques on fabric scraps before working on finished garments. This preparation builds confidence and helps refine your skills for achieving consistently professional results with mesh fabric hemming projects.
Contact MH
MH offers hemming mesh fabrics. Please contact us for more details or inquiries. We're here to help!