How Do I Make a Bow with One Sided Ribbon? Simple Steps Explained
Wondering how do I make a bow with one sided ribbon? It’s simpler than you might think! This article will show you a quick and easy method for making a bow with one sided ribbon. This article provides a step-by-step guide on making a perfect bow, ensuring only the decorative side is visible. You’ll also find tips on choosing the right materials and techniques to get the best results.
Key Takeaways
-
Start with the right materials and tools, including quality scissors and measuring tape, for a successful bow-making experience.
-
Follow a systematic technique to tie a bow, ensuring the right side of the one-sided ribbon is visible, and secure it properly for a polished look.
-
One-sided ribbon bows can enhance gift wrapping, home decor, and fashion accessories; creativity can take your projects to the next level.
Gather Your Materials
Gathering all the necessary materials is the first step to tying the perfect bow. The right tools and ribbon significantly impact the quality and ease of your bow-making process. Imagine trying to make a bow without scissors or with a ribbon that’s too short—frustrating, right? Preparation is key.
Choosing the right ribbon and essential tools is crucial for your craft project. Understanding the different types of one-sided ribbons and knowing which tools yield the best results will set you up for success.
Choosing the Right Ribbon
The type of ribbon you choose significantly impacts the final product. One-sided ribbons are:
-
Often lighter and more suitable for casual or temporary projects
-
Designed with a single, finished side
-
Ideal for projects where only one side is visible
-
Allowing for easier manipulation and a cleaner look when tied
If your project only requires one side to be visible, one-sided ribbon is perfect. Its single decorative side is ideal for gift wrapping or home decor where the back side won’t be seen. Additionally, using double sided ribbon can enhance your projects when both sides need to be decorative.
Choosing the right type of ribbon for your specific needs is key to a relevant perfect bow.
Essential Tools
The right tools are crucial for achieving a professional look in your bow-making endeavors. A high-quality pair of scissors ensures clean cuts, keeping ribbon edges neat and free from fraying. Additionally, a measuring tape helps cut the ribbon to the desired length before tying.
Other essential tools include glue to secure the bow and wire to maintain its shape. These tools help achieve a polished and professional appearance. The quality of your tools directly impacts the quality of your bows.
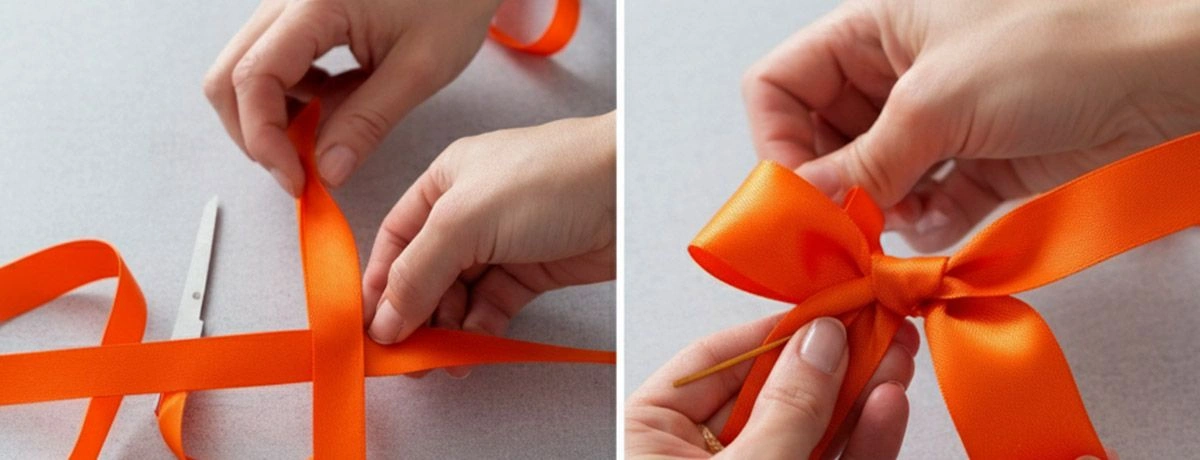
Step-by-Step Guide to Tying a Bow with One-Sided Ribbon
With your materials ready, it’s time to get hands-on. Tying a bow with one-sided ribbon requires careful manipulation to keep the right side visible. Following a systematic technique ensures a perfect bow every time. This method works perfectly for creating a professional-looking bow with one sided ribbon.
Let’s break down the process into an easy method with simple steps.
Preparing the Ribbon
Start by measuring the ribbon according to the desired bow size, typically 18 to 21 inches. Cut the ribbon using a measuring tape to ensure the correct length. Cutting at an angle helps prevent fraying and maintains a neat appearance.
Ensure the ribbon is not twisted before you start tying. A twisted ribbon can hinder the final appearance, making it look messy. Smooth out the ribbon to prepare it for the next steps.
Creating the Loops
With your ribbon prepared, create two loops, often referred to as ‘bunny ears’, while keeping tails at each end. This method ensures a balanced appearance.
Twist the ribbon while forming loops to ensure the right side is visible, showcasing the patterned side outward. Incorrectly twisted ribbons can expose the wrong side, detracting from the overall look.
Make sure the loops are of equal size for a polished finish.
Securing the Bow
Once the loops are created, secure the bow. Twist the tails to keep the right side visible and adjust the loops for balance. This step prevents the wrong side of the ribbon from showing.
Use a hot glue gun to secure the bow or attach it to other items. Properly securing the bow maintains its form and appearance, resulting in a professional-looking final product.
Tips for Perfect Bows Every Time
A few insider tips can help you achieve a perfect bow every time. Cutting the ribbon to the right length and using a lighter ribbon makes beautifully shaped bows easier to create.
Avoiding common mistakes and enhance the quality of your bow can lead to a flawless finish. For even better results, consider watching a video tutorial to visually guide you through the bow-tying process.
Avoiding Common Mistakes
To create a balanced bow and keep it intact:
-
Ensure symmetry when creating loops for a balanced bow.
-
Use a sturdy knot to keep the bow intact.
-
Add a small amount of glue for extra stability.
-
Secure the bow by using wire or string to tightly gather the center, preventing the loops from loosening.
After tying the bow, adjust the loops and secure the ends with a ribbon sealer or a flame to prevent fraying. These simple adjustments significantly enhance the final look of your tie a bow.
Enhancing Your Bow
High-quality one-sided ribbon can significantly elevate your bow’s appearance. Avoid using too much ribbon or leaving uneven loops, as this can ruin the bow’s symmetry and beauty.
For special occasions, add unique elements like flowers or additional fabric to enhance the bow’s design. This personalizes the bow to fit the theme.
Creative Uses for One-Sided Ribbon Bows
One-sided ribbon bows have a myriad of creative uses beyond gift wrapping, elevating your craft projects, home decor, and fashion accessories.
Here are some fun and unique ways to used and enhance these bows.
For more inspiration, you can watch a demonstration to see creative ideas for using one-sided ribbon bows.
Gift Wrapping Ideas
One-sided ribbons allow for unique and elegant gift wrapping, ensuring the bow stands out without overwhelming the gift. These bows can transform simple gift wrapping into eye-catching presentations, adding joy to the recipient’s experience.
One-sided ribbon bows elevate gift presentation, making them visually striking and festive. Whether for birthdays, holidays, or special occasions, a well-tied bow can make all the difference.
Home Decor Projects
Incorporating one-sided ribbon bows into home decor can personalize items like wreaths and centerpieces, adding a touch of charm. Imagine a beautifully crafted wreath on your front door or a centerpiece that captures everyone’s attention at your dining table.
One-sided ribbon bows add elegance to wreaths and centerpieces, enhancing home decor aesthetics. They provide a polished look that complements seasonal decor, making your home feel warm and inviting.
Fashion and Accessories
One-sided ribbon bows can serve as stylish accents on clothing and accessories, enhancing outfits with a playful touch.
From hair clips to belts, one-sided ribbon bows add creative flair. Picture a cute bow on a little girl’s dress or a stylish accent on a handbag. These bows can be sewn onto garments or used as hair accessories for stylish, personalized looks.
Why Choose MH for Your Ribbon Needs
MH is a reliable partner for sourcing high-quality ribbons. Purchasing from MH in bulk can lead to significant cost savings, especially for large-scale projects, which enhances the quality of those services.
MH serves as a one-stop wholesale source, offering a wide variety of ribbons to meet all needs.
Bulk Buying Benefits
Purchasing ribbons in bulk allows businesses to secure significant cost savings and access a wider variety of designs and materials. Bulk buying reduces the cost per yard, making it economical for large-scale projects.
Bulk purchases offer several benefits:
-
Improve supply chain stability, ensuring consistent material availability during peak demand.
-
Minimize the need for frequent reorders and maintain steady inventory levels.
-
Allow for greater customization options, including personalized prints and packaging formats.
Wholesale Partner for Craft and Fashion Industries
MH is a reliable partner for wholesale clients in the craft and fashion sectors, ensuring consistent quality and timely delivery. Recognized as a dependable wholesale partner, MH provides high-quality ribbons tailored for both industries.
MH positions itself as a reliable partner for wholesale clients, facilitating efficient and tailored supply solutions to deliver and maintain google. Serving global wholesale clients only, MH meets the specific needs of businesses worldwide.
Summary
In summary, mastering the art of tying a bow with one-sided ribbon opens up a world of creative possibilities. From gift wrapping and home decor to fashion accessories, the applications are endless. By following the simple steps outlined in this guide, you can achieve perfect bows every time.
Remember, the key to a professional-looking bow is using the right materials and tools. MH offers a wide range of high-quality ribbons, making them your go-to source for all your ribbon needs. Whether for craft projects or large-scale events, MH has you covered. Happy bow making!
For more bow-making tips and tutorials, sign up for updates or follow us on social media to stay inspired!
Frequently Asked Questions
How to tie a bow with single-sided velvet ribbon?
To tie a bow with single-sided velvet ribbon, make two bunny ears and cross them. Then loop one ear behind the other and pull it through the center. Finally, adjust the loops to your desired length.
How to make a simple bow with ribbon step by step?
To make a simple bow, start by folding the edges of a small piece of ribbon toward the center and glue them. Then, wrap this around the center of the bow for a nice finish.
What type of ribbon is best for making bows?
One-sided ribbons are the best choice for making bows because they’re super easy to work with and perfect for casual projects. They’ll give you that cute, effortless look you want!
How long should the ribbon be for a standard bow?
For a standard bow, aim for a ribbon length of about 18 to 21 inches. That should give you enough material to work with for a nice finish!
What tools do I need to make a bow with one-sided ribbon?
You’ll need good scissors, a measuring tape, and some glue to make a bow with one-sided ribbon. Just grab these tools, and you’ll be all set to get crafting!
Contact MH
MH offers ribbons for bow. Please contact us for more details or inquiries. We're here to help!