Cross Stitch How To Thread Needle: Basics and Starting Stitching
Cross stitch represents one of the most accessible forms of counted thread embroidery and is a specific type of hand embroidery, utilizing X-shaped stitches on even-weave fabrics such as Aida cloth or linen. This methodical craft provides both relaxation and tangible results, making it an ideal choice for beginners and experienced crafters alike. For beginning stitchers, cross stitch is especially approachable due to its simple, step-by-step process and the use of embroidery hoops or frames to help achieve even tension.
Success in cross stitch begins with proper preparation and technique. Understanding how to thread your needle correctly and prepare your materials establishes the foundation for professional-looking results. You can choose to start with a kit or gather your own supplies to create your own project, allowing for creativity and customization. This guide covers the essential steps to begin your cross stitch journey, from selecting appropriate materials to completing your first stitches.
Getting Started with Cross Stitch
Cross stitch projects require specific materials and preparation techniques to ensure optimal results. Begin by locating the center point of both your fabric and chart. Most cross stitch charts feature arrows along the edges that indicate the center lines, allowing you to position your design accurately on the fabric.
Prepare your fabric by folding it in half one way, then folding it half the other way. This creates intersecting creases that mark the center points. Mark this intersection point with a pin or small stitch for reference throughout your project.
Aida and linen are woven fabrics that tend to fray when cut. Prevent fabric fraying by binding the edges before you begin stitching. Use a zigzag stitch on a sewing machine, serger, or masking tape to secure the fabric edges. This preparation step protects your investment and maintains clean working conditions.
Hoop making is essential for cross stitch and embroidery projects. An embroidery hoop keeps fabric taut during stitching, providing better stitch control and reducing hand fatigue. When placing the fabric in the hoop, gently pull it taut without overstretching or distorting the weave. Select a hoop size appropriate for your project area, ensuring the fabric remains stable without excessive stretching.
Introduction to Embroidery
Cross stitch is a classic form of counted thread embroidery that uses x shaped stitches to create beautiful designs on open weave fabrics like Aida cloth or linen. When starting a new cross stitch project, it’s important to gather all your supplies: a round end tapestry needle, embroidery floss, an embroidery hoop, and your chosen fabric. Most embroidery floss comes as six strands twisted together, but for cross stitching, you’ll typically stitch with just one or two strands, depending on your fabric and the look you want to achieve. Using a round end tapestry needle helps you glide through the fabric without splitting the threads, making your stitching smoother and more enjoyable. To keep your fabric edges neat and minimize fraying, secure them with a zig zag stitch on a sewing machine, a serger, or simply bind them with masking tape before you begin. Placing your fabric in an embroidery hoop keeps it taut and makes it easier to form even, shaped stitches as you work. With these basics in place, you’re ready to dive into the relaxing and creative world of cross stitch.
Preparing Your Materials
Embroidery floss preparation requires attention to detail for optimal results. Most embroidery floss is made of six strands of thread twisted together. Depending on your project, you may use all the threads or just one strand for stitching. Cut floss strands approximately 18 inches long to minimize tangling and knotting during stitching. Longer threads increase friction and reduce thread quality as you work.
Standard embroidery floss contains six individual strands. Most cross stitch projects require one or two strands, depending on your fabric count and desired coverage. To separate the strands, carefully isolate one strand from the remaining strands and slowly pull it away to prevent tangling and maintain thread integrity.
Select a round-end tapestry needle sized appropriately for your fabric. The needle should pass through fabric holes easily without forcing or enlarging them. Needle sizes typically range from 22 to 28 for cross stitch applications, with higher numbers indicating smaller needles.
Thread your needle using standard hand-sewing techniques, but avoid creating knots at the thread end. Cross stitch requires clean thread management on both front and back surfaces for professional appearance.
Consider using a needle threader if you experience difficulty threading multiple strands through the needle eye. This tool simplifies the threading process and reduces thread waste from repeated attempts.
Understanding Patterns
Every cross stitch project begins with understanding how your cross stitch chart corresponds to the fabric you’re using. The grid created by the fabric’s weave matches the squares on your cross stitch chart, with each colored or black and white square representing a single cross stitch. The chart legend is your guide, mapping each symbol or color on the chart to specific floss colors, so you can be sure your finished piece matches the designer’s vision. To start stitching, find the center point of your fabric by folding it in half both ways, creasing the intersection, and marking it with a small stitch or pin. The cross stitch chart tells you where the center is, often with small arrows along the edges, so you can align your stitching perfectly. Keep your fabric taut in the embroidery hoop by gently pulling it and tightening the screw flat, but avoid stretching it out of shape. A few additional tips for beginners: use a thread pick to separate multiple strands of floss, leave about an inch of thread tail at the back to secure under later stitches, and avoid pulling multiple strands at once to prevent twisting and knotting. By following these steps and understanding how to read your stitching chart, you’ll find cross stitching to be a relaxing and rewarding craft, perfect for creating your own beautiful projects.
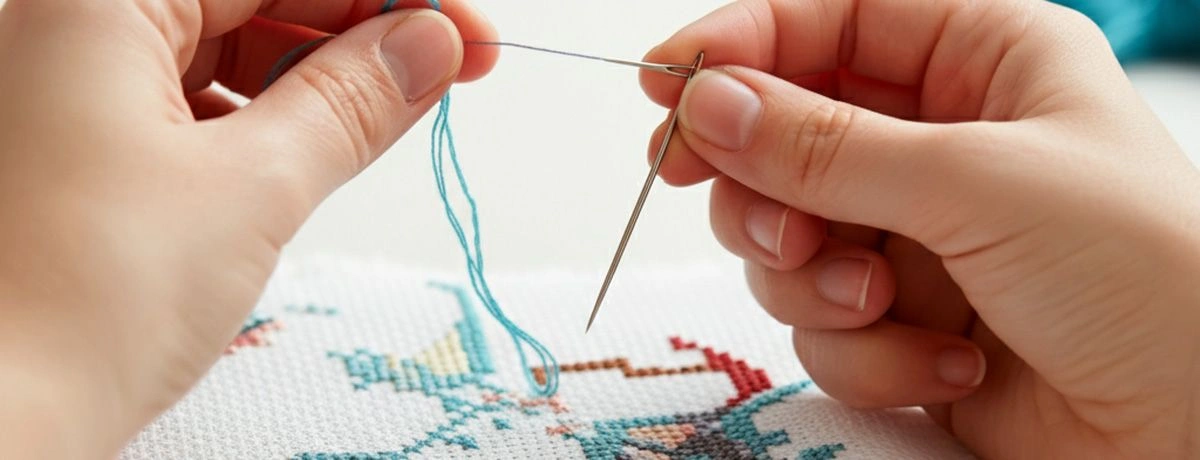
Threading Your Needle
Thread your needle with the predetermined number of strands, typically one or two for standard cross stitch work. When preparing for your project, select the appropriate needle cross stitch—such as an embroidery or tapestry needle—ensuring it suits your fabric and thread thickness. Pull the thread through the needle eye gently, leaving approximately one inch of thread extending beyond the needle.
Secure thread tails by stitching over the tail end rather than creating knots. This technique maintains fabric surface smoothness and prevents bulk that could affect subsequent stitches. Leave about an inch of thread at the fabric back for securing under completed stitches.
Reference your chart legend to accurately match floss colors with chart symbols. Each symbol corresponds to a specific color number, ensuring your finished project matches the intended design. Keep your legend accessible throughout the stitching process.
Begin stitching from the fabric center point, working outward according to your chart. When making your first stitch, focus on securing the thread by stitching over the tail end, which helps maintain even tension and a neat start. This approach ensures proper design placement and prevents miscounting that could affect the final result.
Maintain consistent thread direction throughout your project. All bottom stitches should slant in one direction, with top stitches slanting in the opposite direction. Be sure to stitch tight, checking the back to confirm the thread tail is trapped and tension is even. This consistency creates uniform appearance and professional finish quality.
Completing Your Project
Mastering basic cross stitches is essential as the foundation of counted cross stitch and fabric cross stitch techniques. Each colored square on the chart represents a stitch, and the chart represents the overall design, guiding you on where and what to stitch.
Work cross stitches in organized rows, completing each row before advancing to the next. This systematic approach reduces counting errors and maintains consistent tension throughout your work. When working in rows, focus on continuing stitching along the row for consistency and a seamless appearance. Always keep your stitches in the same direction for a neat and uniform finish.
You can create individual cross stitches by making individual cross stitches—completing each X-shape fully before moving to the next stitch. This method is especially helpful in areas where it is easier to complete cross stitch before proceeding, improving accuracy and control. Alternatively, work in rows by completing all bottom stitches (half cross stitches) first, then returning in the opposite direction to add the second half cross stitch, thus forming the complete cross stitch. To make a half cross stitch or slanted half cross stitch, pass your needle through the hole diagonally across from your starting point, creating the desired slant as part of the broader needlework embroidery technique.
When thread runs short or pattern sections end, secure the remaining thread by passing your needle under at least three completed stitches on the fabric back. Trim excess thread close to the fabric surface, maintaining clean work area conditions.
Keep fabric appropriately taut in your hoop throughout the stitching process. Loose fabric creates uneven stitches, while excessive tension can distort the weave and affect finished project dimensions.
Monitor your progress regularly against the chart to catch counting errors early. Correcting mistakes promptly prevents extensive rework and maintains project momentum.
Taking Pride in Your Craft
Cross stitch projects represent significant time investments that yield lasting satisfaction. Each completed project demonstrates your developing skills and attention to detail, creating tangible reminders of your crafting journey.
Quality materials and proper techniques directly contribute to professional-looking results. Investing time in correct preparation and execution methods ensures your finished projects reflect your best efforts and provide long-term enjoyment.
Contact MH
MH offers needles. Please contact us for more details or inquiries. We're here to help!