Sewing Machine Stitches Loose on Bottom: Fixing the Issue on Your Projects
Loose stitches on the underside of your fabric can be a frustrating issue for any sewing enthusiast. It not only affects the quality of your work but can also result in wasted time as you try to figure out what went wrong. If you’ve been Googling "sewing machine stitches loose on bottom," don’t worry. This guide will help you diagnose the problem, explain why it happens, and teach you how to fix it for good.
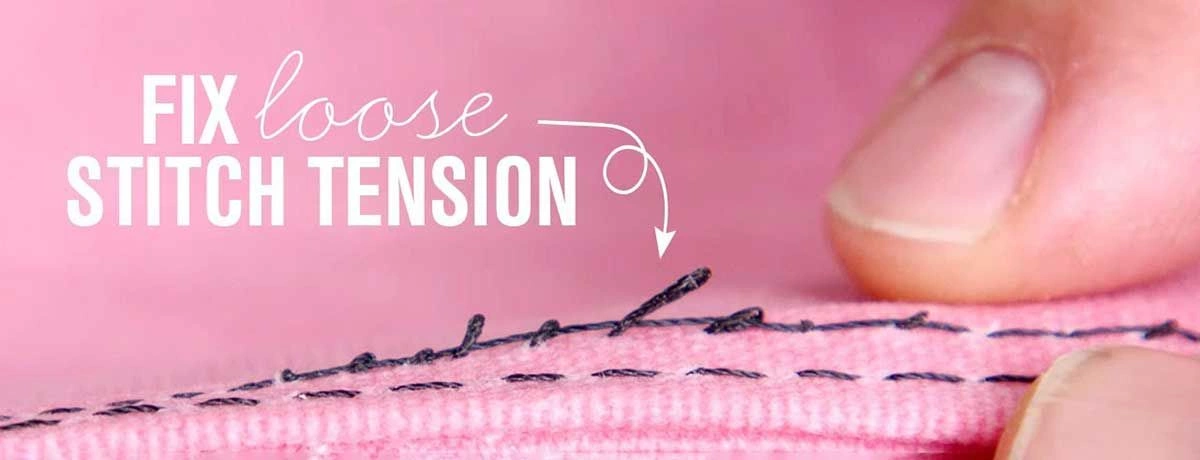
Why Are Sewing Machine Stitches Loose on the Bottom?
Understanding the root cause of loose stitches on the bottom of your fabric is essential. Typically, this issue arises from problems with thread tension, either in the upper thread, the bobbin thread, or both. When either thread isn’t at the proper tension level, your stitches won’t balance correctly. Ensuring that the upper tension is set correctly is crucial to avoid these problems.
Here are some common reasons this happens:
-
Improper thread tension settings
-
Loose bobbin tension
-
Incorrect threading of the machine. It is important to ensure that both upper and lower threading are adjusted correctly.
-
Improperly wound bobbins
-
Lint buildup around the bobbin area
-
Incorrect needle size or type
Every sewing machine is a little different, but the principles remain the same. Let’s break down how to identify and solve these issues effectively. Remember, the two tensions need to meet in the middle for optimal stitching quality.
Identifying the Issue
Identifying the issue with your sewing machine is the first step in resolving the problem. When it comes to loose stitches, it’s essential to understand the underlying cause. Start by examining the underside of your stitches. If the bottom thread appears loose, it may indicate that the bobbin tension is too weak. Conversely, if the top thread is loose, it could be a sign of incorrect upper thread tension. By pinpointing whether the issue lies with the upper thread or the bobbin, you can take targeted steps to correct it. Remember, a balanced stitch requires both tensions to be set correctly.
Broader Identification Process
The broader identification process involves a comprehensive check of your sewing machine. Begin by inspecting the tension spring, thread guide, and bobbin case. Ensure that the thread unwinds correctly and passes through the machine without any obstacles. It’s also important to verify the direction in which the thread is loaded. Incorrect loading can lead to tension issues and loose stitches. If you’re still unsure about the problem, you can find helpful video tutorials online or consult your sewing machine’s manual. These resources can provide visual guidance and additional tips to help you identify and resolve the issue effectively.
Adjusting Thread Tension for Balanced Stitches
Thread tension plays a crucial role in stitch quality. Proper tension ensures that the top and bottom threads form tight, even stitches without loops or loose threads. It can be hard to diagnose tension problems without visual aids. Making sure that various components function correctly is essential to achieve optimal sewing results.
Understanding Thread Tension
Thread tension involves two key components:
-
Upper Thread Tension: Controlled by a tension dial, it determines how tight the upper thread is as it moves through the machine. Adjusting the top tension can help resolve issues with loose stitches on the bottom.
-
Bobbin Tension: Found inside the bobbin case, it determines the tightness of the thread as it feeds from the bobbin.
Steps to Adjust Thread Tension
-
Upper Thread Tension: Locate the tension adjustment dial (usually on the front or top of the machine) and adjust it incrementally. Turning it clockwise increases tension, while turning it counterclockwise decreases it.
-
Bobbin Tension: If your bobbin tension is too loose, it can result in loose stitches on the bottom. To adjust it, find the small screw on the side of the bobbin case. Tighten it slightly using a small screwdriver. Always make minor adjustments and test stitch on scrap fabric after each turn. Tightening the top tension a bit can help ensure proper stitching balance between the top and bottom threads.
Ensuring Proper Threading
Incorrect threading is a common cause of tension issues. Re-thread the upper thread following your machine’s threading guide, ensuring it moves through all thread guides smoothly. For the bobbin, make sure it is wound evenly and placed properly in the bobbin case. Hold the end of the thread while inserting it into the bobbin case to ensure it is properly seated. Incorrect threading, such as threading the bobbin backwards, can cause tension issues.
Pro Tip: Always thread your machine while the presser foot is raised. This keeps the tension disks open and ensures the thread seats correctly.
Common Sewing Problems
Sewing machines can experience a range of problems, from loose stitches to thread breakage. Understanding these common issues can help you troubleshoot and resolve problems quickly, ensuring your projects are completed smoothly.
Overview of Common Issues Beyond Loose Stitches
Beyond loose stitches, common sewing problems include uneven tension, thread tangling, and skipped stitches. Uneven tension can result from incorrect bobbin tension or upper thread tension. Thread tangling often occurs when the thread is not threaded correctly or when the machine is not properly maintained. Skipped stitches can be caused by a dull needle or incorrect needle size. To avoid these issues, regularly check and maintain your sewing machine, including cleaning the tension spring and bobbin case. Regularly turning the handwheel to check the tensions can help identify potential issues before they become major problems. Additionally, consulting the user manual or visiting a Brother authorized service center can provide valuable information and assistance in resolving any issues that may arise. By being aware of these common problems and taking preventive measures, you can ensure that your sewing machine continues to work smoothly and efficiently.
Common Issues and How to Address Them
Even with proper tension, other factors can cause stitching problems. Below are some of the most common problems and solutions: Adjusting tension or reinstalling the bobbin could fix various things in the sewing process. Ensure the pressure foot is firm enough to hold the fabric against the feed dogs. Simple interventions often lead to the machine resuming normal operation, emphasizing that the machine works effectively.
-
Loose Bobbin Thread
-
Ensure the bobbin is wound evenly and inserted properly into its case.
-
Check if the bobbin thread flows freely without pulling excessively.
-
Incorrect Needle Size
-
The wrong needle size or type can distort your stitches. For lightweight fabrics, use smaller needles, while heavier fabrics require larger ones.
-
Lint Buildup
-
Dust and lint around the bobbin case or tension disks can interfere with smooth operation. Clean these areas regularly.
-
Thread Quality
-
Low-quality threads can fray easily and lead to poor stitching. Always choose strong, high-quality threads suited to your fabric type.
-
Improper Tension Settings
-
Avoid setting the tension too high or too low, as this causes uneven stitches. Balance is key.
Test your fixes by sewing on a piece of scrap fabric to ensure your stitches are balanced before returning to your project.
Troubleshooting and Practical Steps
Sometimes the fix is as simple as re-threading or cleaning your sewing machine. Here’s a step-by-step process to troubleshoot loose bottom stitches: Making sure that various components function correctly is crucial to achieve optimal sewing results. The top and bottom threads need to meet in the middle for balanced stitching.
Step 1: Re-Thread the Machine
-
Remove both the upper and bobbin threads.
-
Re-thread the machine carefully, ensuring both threads pass through all guides correctly.
Step 2: Check Your Needle
Replace dull, bent, or otherwise damaged needles. Encountering challenges when using a new material for the first time may require adjusting sewing machine settings. Ensure the needle size matches your fabric type.
Step 3: Adjust Bobbin Tension
Tighten or loosen the bobbin screw slightly as needed. Ensure the bobbin thread is correctly loaded in relation to the slot, as the direction of the thread winding can affect tension. Test stitch as you go.
Step 4: Adjust Upper Thread Tension
Use the tension dial to tweak the upper thread tension until stitches are balanced. Adjusting the top tension can help resolve issues with loose stitches on the bottom, as the interplay between the top and bottom threads is crucial for a balanced sewing outcome.
Step 5: Clean the Machine
Remove lint and debris from the bobbin case, tension disks, and feed dogs using a small brush or compressed air. Factory defects and variations in sewing machine components can also cause issues, so it's important to check for any inconsistencies that may have come from the factory.
Step 6: Test with Scrap Fabric
Sew a few stitches on a piece of scrap fabric to confirm that the adjustments have resolved the issue. If the stitching is still not balanced, try tightening the top tension a bit to ensure proper stitching balance between the top and bottom threads.
Pro Tip: Consult your sewing machine’s manual for specific troubleshooting tips designed for your model.
Preventing Problems with Bottom Thread Tension
The best way to avoid stitching issues altogether is through regular maintenance and proper setup. Here’s how to keep your machine running smoothly:
-
Routine Cleaning: Clean the bobbin case, tension disks, and feed dogs after every project to remove lint and dust. Paying a lot of attention to these technical details can help achieve optimal results. Certain solutions, like the drop test for checking bobbin tension, are awesome and effective in resolving tension-related problems.
-
Check Thread and Bobbin Quality: Invest in high-quality thread and ensure bobbins are wound properly.
-
Use the Right Needle: Select needle sizes and types based on your fabric.
-
Regular Maintenance: Have your sewing machine serviced professionally at least once a year.
-
Adjust Tension for Each Project: Different fabrics and threads require different tension settings, so always adjust accordingly.
By incorporating these preventative measures, you’ll spend less time troubleshooting and more time enjoying your projects.
Take Control of Your Sewing Machine Stitches
Loose stitches on the bottom of your fabric can disrupt your sewing flow, but with the right knowledge and adjustments, you can solve the issue quickly. By understanding thread tension, recognizing common problems, and following a clear troubleshooting process, if users continue to experience problems with thread tension, it may indicate that the machine requires professional servicing. Additionally, proper tension and setup are crucial while working with various materials. You can achieve balanced, flawless stitches every time.
Regular maintenance and attention to detail will ensure you get the best performance out of your sewing machine. For more tips on maintaining your machine and improving your sewing skills, be sure to explore additional resources.
Happy stitching!
Contact MH
MH offers sewing threads. Please contact us for more details or inquiries. We're here to help!