Mastering How to Put Grommet in Fabric: A Step-by-Step Guide
Need to know how to put grommet in fabric? This guide will cover everything: the tools you need, marking and preparing your fabric, making clean holes, and securing the grommet effectively. Grommets are commonly used in projects like curtains, bags, leather, vinyl, cork, belts, and tents, providing reinforcement for openings that experience frequent use or tension. Grommets are also used for venting in shoes and other items, allowing for airflow and breathability where needed.
With a little practice, you’ll find that installing grommets makes sense for reinforcing and decorating a wide range of materials. The creative possibilities are endless—grommets can be incorporated into various patterns and designs, making sense for both functional and decorative purposes.
Introduction to Grommets
Grommets are small rings designed to reinforce holes in fabric and other materials, making them essential for a wide range of projects. Whether you’re working with curtains, bags, leather, or even vinyl and cork, installing grommets provides a secure and durable way to insert cords, ropes, or fasteners without worrying about the material tearing or fraying. These tiny hardware pieces are especially useful for adding strength and longevity to openings that experience frequent use or tension.
When it comes to grommet installation, having the right tools is key. A typical grommet tool kit includes a hole punch, anvil, and setter—each playing a crucial role in creating clean holes and securing the grommet in place. Metal grommets are the most popular choice due to their durability and ability to withstand heavy use, but plastic grommets and rubber grommets are also available for specific needs, such as lightweight fabrics or moisture-prone environments.
Installing grommets is a straightforward process that can be mastered with a little practice and the proper tools. In this guide, we’ll explore the basics of grommets, walk you through the easy steps to install them, and help you choose the best type and size for your project. Whether you’re looking to reinforce holes in fabric, add a professional touch to your sewing projects, or simply need a reliable way to secure openings, understanding how to install grommets will open up a world of creative possibilities.
Key Takeaways
-
Start with essential tools like a hole punch, setter, and anvil to ensure proper grommet installation.
-
Prepare your fabric by marking positions and using fusible interfacing to prevent fraying.
-
Match grommet size to hole size and choose appropriate grommet materials depending on fabric type to avoid common installation mistakes.
Essential Tools for Installing Grommets
Starting your grommet installation requires a few key tools. A grommet tool kit generally includes:
-
a hole punch
-
a setter
-
an anvil These are basic necessities for creating and securing grommets. These tools help handle the grommet and fabric properly during installation. A grommet kit is a convenient option for beginners, as it comes with all the necessary tools and components for installation, making the process much simpler.
For those looking for efficiency, the following tools are highly effective for quick grommet installations:
-
Grommet pliers, especially useful with lighter materials like cloth or canvas
-
Die tool sets
-
Grommet press machines, which can significantly streamline the process and make it easier and faster to install multiple grommets
Whichever tools you choose, protect your work surface with a backer board or a piece of scrap wood to avoid damage. It's also important to work on a hard surface, such as a sturdy table or floor, to ensure effective use of a hammer and anvil. With the right tools ready, you can start preparing your fabric.
Preparing Your Fabric
Proper preparation of your fabric is crucial before installation. Precisely marking the position for each grommet ensures an even and tidy final product. A pencil can help you achieve this precision.
If you are following a sewing pattern, be sure to mark all grommet placement points as indicated in the pattern instructions.
For thin fabrics, applying fusible interfacing behind the grommet area can enhance strength and prevent fraying. This small step significantly improves your project’s durability by stabilizing the fabric for a secure grommet fit.
Lay the fabric flat and smooth to achieve the best results, preventing issues with the grommet’s attachment and the overall appearance of your project. Once prepared, you’re ready to make the hole.
Making the Hole
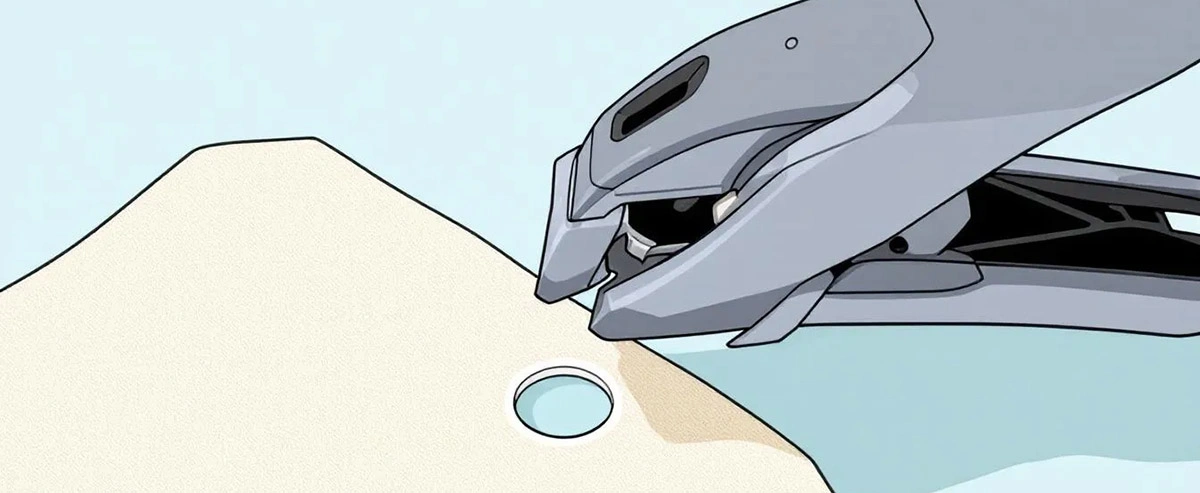
Clean holes in the fabric hole are crucial for grommet installation. A sharp hole punch tool helps achieve precise cuts, reducing the risk of fraying and ensuring a secure fit for the grommet to reinforce holes.
To make holes in fabric for grommets:
-
Use a cutting mat or scrap wood under your fabric to protect your work surface.
-
Position the hole punch over the marked spot, aligning it with the center of the mark.
-
Hit the hole punch with a hammer to create a clean, accurate hole.
-
Ensure the hole size matches the grommet diameter for a proper fit. The opening created should be clean and free of frayed threads.
Creating precise holes lays the foundation for a secure, professional-looking grommet installation.
Caution: Always check for sharp edges around the hole, especially when working with metal or thick materials, and smooth them if necessary to prevent injury or damage.
Now, it’s time to insert the grommet.
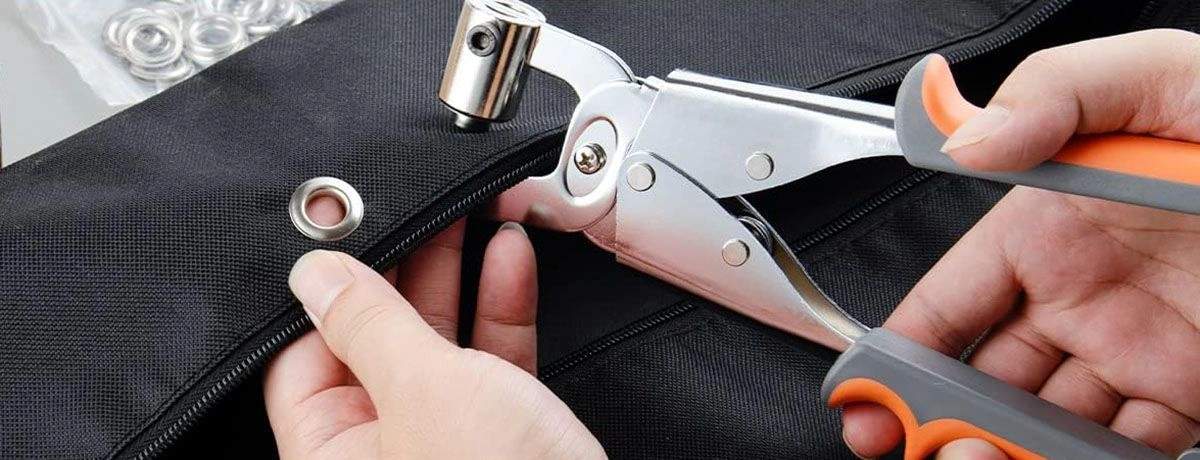
Inserting the Grommet

With a clean hole ready, insert the grommet. You may need to push the grommet through the hole to ensure a snug fit. Ensure the eyelet faces outward and place the washer on the back side of the fabric. Proper alignment is crucial for the grommet to function effectively and look professional.
Grommets typically come as a pair of two pieces: the grommet and a washer. These two pieces are secured together during installation. Apply sufficient pressure with a grommet tool or hammer, pressing the grommet and washer together to securely attach them. Patience and precision are required to ensure the grommet is firmly in place without damaging the fabric.
With the grommet in place, secure it properly to ensure it holds up under stress and adds a polished grip to your project.
Securing the Grommet
Securing the grommet is the final step. A grommet setter ensures even pressure, preventing misalignment and ensuring a tight, durable fit. Using the correct tool is crucial to avoid misalignment or damage.
For a gentler impact, try a rubber mallet instead of a traditional hammer to prevent damage to delicate fabrics while still securing the grommet effectively. For two-piece grommets, place the washer underneath to ensure a tight fit and durability.
With the grommet securely in place, your project is reinforced and ready for use. The grommet is now installed and should be checked for a tight, secure fit. Working with plastic and other materials may require adapting these techniques.
Tips for Different Fabrics and Materials
Different materials need different approaches for installing grommets. For lighter fabrics like cotton and linen, smaller grommets are recommended to maintain a clean, secure finish without overwhelming the fabric.
When installing multiple grommets, it's important to keep them in a straight line for a professional appearance.
For heavier fabrics like denim or canvas, larger and stronger grommets provide adequate support and durability. These fabrics need more robust hardware to withstand added weight and stress.
For leather, using robust metal grommets and the right tools is crucial for proper installation. Always choose compatible grommets to ensure effective installation.
Common Mistakes to Avoid
Mistakes can happen even with the best intentions. A common error is mismatching the grommet size with the hole, preventing proper securing and potentially leading to tearing. Ensure the hole size matches the grommet size for a proper fit.
Another mistake is using incompatible grommet materials with softer fabrics, which can cause tearing. Ripping when over-applying force when securing grommets is also common and can damage both the grommet and the fabric.
Being mindful of these common mistakes helps ensure successful grommet installation every time. Make sure you don't miss any steps in the grommet installation process to achieve the best results. Looking to source grommets in bulk? Consider wholesale orders.
Wholesale Order
For those needing grommets in various sizes and finishes, MH is a professional wholesale supplier of garment accessories and fabrics. They offer grommets and eyelets in:
-
Brass
-
Aluminum
-
Stainless steel
-
Nickel-plated finishes These are suitable for:
-
Curtains
-
Tarps
-
Canvas
-
Bags
-
Shoes
-
Garments.
MH is known for reliable quality, wide product selection, and consistent supply to customers in over 150 countries. They provide sewing supplies and tailoring materials for manufacturers, wholesalers, and fabric producers worldwide. Additionally, they offer tools to sew effectively.
With over 20 years of experience in garment accessories manufacturing, MH offers:
-
Competitive factory prices
-
Custom sizes, colors, and packaging options
-
Fast global shipping
-
Professional export support
For more tips on sourcing grommets and hardware in bulk, check out our related post for helpful advice and step-by-step instructions.


Summary
In this guide, we’ve covered the essential steps to mastering grommet installation. From gathering the right tools to preparing your fabric, making precise holes, and securing the grommets, each step is crucial for a professional finish. We’ve also discussed tips for different fabrics and how to avoid common mistakes.
By following these steps and using the appropriate tools, you can achieve a clean, secure, and durable grommet installation. Whether you’re working on curtains, tarps, bags, or any other project, these techniques will help you achieve excellent results.
So, go ahead and apply these techniques in your next project. With practice and attention to detail, you’ll become proficient in grommet installation, adding a touch of professionalism to all your creations. And if you’re interested in more advanced grommet techniques, wait for our upcoming tutorials and updates!
